Tuesday, September 29, 2020

Master Bathroom Makeover: Part I (Lots of painting!)

I'm trying to remind myself that I don't always have to wait until finishing a DIY project to blog about it. I mean, let's face it, it's usually weeks or months from beginning to "end." And for my latest project (our master bathroom makeover) that's certainly the case. With that said, here's a progress update!

Back in July, I started painting all the walls. The old color was Tree Branch by Sherwin Williams (don't ask why I chose this color in the first place).


The new color is Colonnade Gray by SW. Bye bye, brown!


Maneuvering the ladder in the toilet room was one of the worst parts. But it doesn't feel like a dark cave in there anymore!


A few weeks after the walls, I worked up the motivation to start painting our vanity. Chalk painting is my go-to method for transforming cabinets without paying for brand new ones (see our kitchen makeover and hall bathroom makeover). This time, however, I got much more adventurous and ambitious with my technique than past projects. What did I have to lose? Anything would be an improvement over the orange-y oak stain.

My initial goal was to achieve some kind of aqua/turquoise color that would complement the walls and existing tile floor (which I'm not a fan of, but definitely not replacing it). After a great deal of experimenting on scrap wood with color mixing, layering and waxing, I finally came up with a winning combination.

  • First, I painted on a layer of Annie Sloan Florence. This color is bold and beautiful. I want to use it again someday for a smaller accent piece, but for this vanity it made a good base color.
  • For the second layer, I mixed together French Linen and Provence with some water to create a color wash and lightly brushed that on.
  • I distressed the edges by wiping a damp cloth along the edges to remove some of the paint.
  • Once everything was dry, I applied clear wax followed by dark wax, which was then wiped off to create an antiqued effect. 
First coat...


Color wash...


Lightly distressed edges...


Antiquing with dark wax...


Of course, these were just the doors and drawers. I also had to do the same thing to the rest of the vanity, which was more tedious with all the taping. As you can see, I was too impatient/lazy to even take out our toiletries.


When this all began, I thought I might end up spray painting or even just replacing the hardware. But once I saw the end result from the chalk painting and waxing, our existing hardware color (an antiqued brass) was actually perfect for this new look. Score!


Since then I've also painted the wood panels of our jetted tub using the same process. And we've ordered a new all-white countertop with integral sinks from Home Depot, as well as two brushed gold faucets that should tie everything together nicely. My hope (at the risk of jinxing something) is that we'll have all that replaced within the next month and can officially check this master bathroom makeover off the list! Stay tuned...


Saturday, July 25, 2020

Painting the Master Bedroom, Part II: Sherwin Williams Colonnade Gray

Before we get to this reveal, let me just say that it's solely based on the paint transformation alone. So please don't judge based on my bedroom styling skills or the size of our humble master bedroom. :)  

Okay, moving on. So for all of you who like instant gratification, here's our newly painted bedroom featuring Sherwin Williams Colonnade Gray! I'm super thrilled with it and when you see the photos of what it looked like before, you'll understand why.


There are some additional before pictures and progress pictures in my previous post, but here's a quick refresher of the chocolate brown walls (actually Tree Branch, an SW color):

Saturday, July 18, 2020

Painting the Master Bedroom, Part I: Sherwin Williams Colonnade Gray

The last time I painted our master bedroom (and bathroom) walls was six years ago, in the summer of 2014 to be exact. At the time, I do recall being happy with the chocolate-y brown Sherwin Williams Tree Branch and Tavern Taupe colors that we'd chosen. But as the years have gone on, I've become increasingly turned off by the dark walls, especially since we don't have a lot of natural light in the bedroom (and virtually none in the bathroom). I'd rather be eating chocolate than looking it at on the walls.

These pictures were taken a few years ago after I got a new duvet cover, and before I had painted the trim white in the bedroom. But you get the idea of how dark and cave-like cozy the room is, especially with the dark furniture too.


The ceiling had been painted Tavern Taupe, which was slightly lighter than the Tree Branch on the walls.


Last summer, I almost got the motivation to repaint the bedroom (and bathroom) all again. I even painted a few color samples on the walls. Then, I just couldn't make up my mind and eventually lost the motivation altogether. Honestly, the thought of repainting everything again was overwhelming, and I felt too busy with work and other things to deal with it.

Saturday, May 30, 2020

Replacing Floor Registers: Small Project, Big Impact!

One thing I've been wanting to do for quite awhile (at least ever since we replaced our flooring a few years ago) is upgrade our floor registers. These utilitarian brown-ish metal ones were big eyesores next to our weathered vinyl plank floor. But despite being an extremely simple "project" to replace the floor registers, it just hasn't ranked very high on our priority list. 


Saturday, May 16, 2020

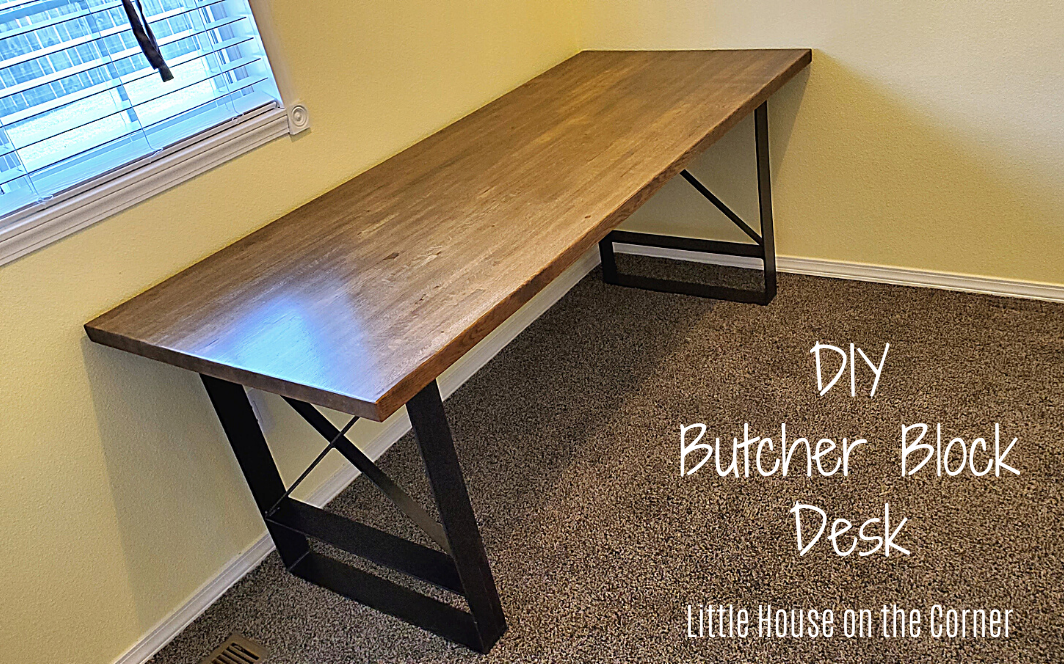
DIY Butcher Block Desk for the Home Office

Sooo, it's been nine months since my last blog post. Although given my track record the past couple years, that should come as no surprise to anyone. But I'm determined to get somewhat caught back up and start sharing projects more regularly here, even if they seem small and insignificant. (Don't hold your breath though.)

That said, I'm going to ease back into this with a look at our latest DIY project: a butcher block desk. Keep reading below for the details!


We've had two very large slabs of oak butcher block sitting in a spare room for several years (yes, years) now. They were left over from our kitchen countertop project, because we originally bought enough for a waterfall-style breakfast bar, which we did not end up doing. 

So anyway, last month we finally came to terms with the fact that we were never going to get around to making a built-in desk for an office downstairs (our original grand plan when we moved into our house)... so the butcher block now seemed like the obvious choice for creating a minimalist standalone desk. And, given that I have been working from home (due to the Covid-19 pandemic) for the past seven weeks using our dining room table as my workspace... I was beyond ready for a real, grown-up desk in an actual dedicated home office.

Sunday, August 11, 2019

Copper accents for the kitchen

I like shiny things. I can't help it. Copper accent pieces have been my weakness for awhile, but I'm trying not to overdo it. In our kitchen especially, we already have a metallic mosaic backsplash, so I gotta reign myself in. 

That said, I have found four copper items that happily reside in the kitchen (three of which happen to be purchased from Amazon, my other guilty pleasure). 

Indoor Compost Bin
In an effort to reduce my carbon footprint just a smidge, I purchased this little countertop compost bin last year. It's basically a copper pail with a lid that has a charcoal filter to absorb odors. So instead of throwing fruit and vegetable scraps (and other compostable items) in the trash, I toss them into a liner inside this little copper pail. To be clear, the pail itself does not turn food into compost -- it's just a cute, non-smelly way to contain your food scraps. Since I don't have a yard composter nor do I use compost in our yard, I take this little bin to our office when it's full and dump it into buckets which are picked up by a community composting service.


Moscow Mule Mugs
Moscow mules might be one of my favorite drinks, but surprisingly we did not own a proper vessel to drink them from until recently. Once we finished our floating shelves in the kitchen, I knew that Moscow mule mugs would be the perfect dual-purpose accent (decorative and functional!). After researching a few options on Amazon, I ended up purchasing a set of two that also came with two mini-mugs which I assume are the equivalent of a shot glass. All in all, it contributes to a nice little shelf display. 

Saturday, July 20, 2019

Master bathroom updates (and a motivation problem)

Well, this is my third post of 2019 and it's already halfway through July, so.... yeah. Figured I should come up with some kind of update to share, even though it'll be hard to top our kitchen makeover! We've been tackling a few things here and there around the house, and I've been spending more time outside this spring and summer planting new flowers and maintaining our landscaping beds.


Other than that, last month I got the itch to repaint our master bedroom and master bathroom. I'm kinda [very] over the milk chocolate shade of brown I painted them a few years ago. After painting a few samples of various "greige" shades in both our bedroom and bathroom and agonizing over which color to go with... I eventually lost all motivation to repaint all those walls yet again. Ha! It just felt too overwhelming all of a sudden. 


Yes... it's very dark in here, especially with no windows to let natural light in. I'm not sure why I ever thought this brown was a good idea...

Before

The one thing I did follow through with, however, was to paint the trim white in the master bath (which I've done in all the rest of the rooms and just never got around to in our bathroom). I followed the same system that proved successful before -- three coats of Kilz premium primer and two coats of Sherwin Williams ProClassic interior acrylic latex.

LinkWithin

Related Posts with Thumbnails