Showing posts with label Organization. Show all posts

Saturday, March 24, 2018

Space-saving Solutions for the Pantry

My biggest achievement of the week is actually hidden behind a closed door. Go figure. But that doesn't make it any less gratifying!

Lately I've grown increasingly frustrated with our cluttered pantry. I've already come to terms with the fact that it will never be a bright, beautiful, Instagram-worthy pantry — but surely I could at least improve upon its current state: 


The issue really boils down to not using the space that efficiently. Although the freestanding red wire shelves have certainly helped by giving me two levels to work with, there was still a lot of vertical space to be taking advantage of. So one night last week I headed to Amazon in search of organization inspiration. 

Friday, November 4, 2016

DIY Farmhouse-style Wall Organizer for the Kitchen

For quite some time now, this idea has been percolating in my head. With the ongoing transformation of our "modern farmhouse" kitchen, I knew we would need a new wall organizer customized for this space. (Here are a few kitchen de-cluttering inspiration ideas I posted recently.) 

The existing organizer, which hangs on the narrow wall behind our door to the garage, was very sad and outdated. Along with being a holder for our keys and dog leashes, it had become a dumping ground for random receipts, appointment reminder cards, gift cards, etc. Quite frankly, we had let it get pretty junky looking. 


At first I thought of just painting the wood frame white to give it a fresh updated look.  (That's pretty much what I've done with everything else around here.) But I still really didn't like the look of the corkboard anymore, and the three cubby holes were too small.  On to Plan B...

Thursday, October 20, 2016

Operation Declutter: Organization Ideas for the Kitchen

I'm generally a pretty organized person.  I like to have a place for everything, and everything in its place.  I try to sort through junk mail right away and deal with the rest as needed.  

With that said, I have my moments where things start to get a little out of control.  Our current kitchen renovation being one of them.  For some reason, it's less motivating to stay organized when everything around you is just a mess.  But once we get the kitchen all put back together and it looks amazing (hopefully), I'm going make a conscious effort to get-and stay--organized again. 

It irks me when papers, junk mail, and other random things accumulate on the counter.  Counter space is valuable real estate in our small kitchen, so I'd prefer to keep it as uncluttered as possible.  I've been brainstorming a few ideas for a mail station/organizer to hang on the wall behind our door in the kitchen.  Aside from mail, it needs to be a drop zone for keys, dog leashes, sunglasses/wallet/cell phone, etc.  A low profile is also important since it's right behind the door.

Tuesday, October 4, 2011

Under-the-Sink Panels: From Fake to Functional

You know what I'm talking about, right?


Yeah, those panels under your sink that look like drawers, but really aren't. Up until recently, I didn't think there was anything that could be done to make these usable. Then I saw something amazing at a friend's house. They had turned their front panels into a storage space.

So this weekend, we went to Lowe's in search of the kit that could make this happen for us, and found it in the kitchen organization section (imagine that). We needed the 14" size, which was $18.57 for two trays.


See where this is going? Maybe I'm behind the times, but I did not know such a thing existed.

At first, I was determined to make this my own project and do it without any of Luke's help. But it didn't take long before I realized my foolishness. These things just go much quicker when he lends his handiness (as much as I hate to admit it). Oh well, teamwork is a good thing, right?

The kit came with a pretty decent set of instructions, which we followed for the most part.


First, we had to take out the panels and remove the pesky plastic strip things that were stapled into them.


Then it was a matter of measuring and marking where to drill the pilot holes for the hinges and tray slots, as well as the holes in the frame opening itself. The kit came with templates to help do this.


The trickiest part was drilling the screws into the frame openings, because of the tight spaces we were working with. (And during this part, it really was helpful to have an extra set of hands to hold the panel in place.) Finally, we got them all tightened up. The result? Two shiny new storage trays just begging to be filled with crap!


Now I had a place to put the aforementioned, unsightly crap that normally clutters up the sink area (scrubber, scraper, drain plugs, water softener monitor that we never use, etc.)


The whole project probably took about an hour and a half, which I think was well worth it. Our sink/counter looks much less cluttered (except for the wand scrubber, which wouldn't fit), and you'd never know the sink panels are secret organizers now. Genius!


So tell me, did you know these sink tray kits existed? Have you already turned your fake panels into functional panels?


NOTE: Little House on the Corner is a participant in the Amazon Services LLC Associates Program, an affiliate advertising program designed to provide a means for sites to earn advertising fees by advertising and linking to amazon.com.


Thursday, September 8, 2011

A "Floating" Cabinet

Our laundry room has been in dire need of some storage solutions. Currently, we have one wall that we use to stack things up against, but we also wanted to figure out a way to utilize the space above the washer and dryer for additional storage.


Awhile back, Luke scored some free cabinets from a school/office that was being renovated, and we’ve had a couple of them sitting in our basement ever since then, just waiting to be put to use. (And let me just say, these things are heavy.)

I wasn't sure how to go about hanging a cabinet in this space, with all the plumbing/drain pipes against the wall. But Luke had the idea to built a “floating” frame of sorts to house one of the cabinets above our washer. In theory, it seemed pretty simple, but it ended up taking quite a bit of figuring, measuring, leveling, squaring, and tweaking. In a nutshell, this is how it all went down:

First, we measured the depth of one of the cabinets and cut a 2x4 that length, then screwed it into the studs of the wall in the laundry room. Then, we cut a treated 2x3 to the height of the cabinet and glued it to the concrete wall with LocTite. Once it had set, we also nailed it in for extra reinforcement, using our handy Duo-Fast Strike Tool. (We used a 2x3 here because we were up so close next to the drain pipe.)

Next, we attached a 2x4 to the joist above, in case we ever decide to finish the laundry room and add a ceiling.

After that, we cut two more pieces to support the other side of the cabinet. These were screwed together at the corners, and then screwed into the treated 2x3 and the 2x4 above. Now we had a frame for the cabinet to rest in.


It wasn’t fun trying to lift that sucker up above our shoulders and shove it into the space, but we finally managed. It was a very snug fit. From the inside of the cabinet, Luke also added screws to attach it to the frame. I have to admit, I was a little paranoid about how this set-up would support the weight of the cabinet, but it seems pretty sturdy. We may go in and add another 2x4 beneath for extra reinforcement.


Now I have a convenient place to store detergent, dryer sheets, and miscellaneous items that would otherwise be scattered haphazardly around the room.


As you can see, I still need to fill it up. Not a bad problem to have. Eventually, I'd also like to add a rod to the left of the cabinet to hang clothes to air-dry.

What's your laundry room storage situation?


Tuesday, May 31, 2011

Coming out of the closet

No, not that closet. This closet:


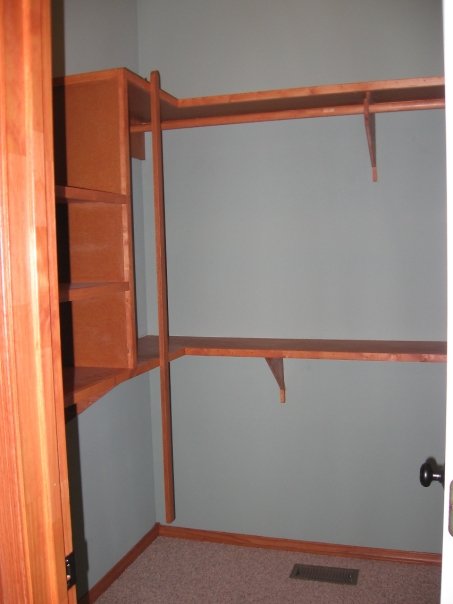
The closet off of our master bathroom is pretty decent sized. It's a walk-in at least, so I guess I shouldn't complain. Still, we've managed to fill it to capacity, and then some (Luke blames that all on me, of course). I thought I had taken more photos of the closet before we moved in, but I could only find the one above. It doesn't really show much, but hopefully you get the idea.

Basically, there were (and still are) open shelves on all three walls, with one rod against the back wall for hanging clothes. And you can't see it, but there's also a rod on each side way up near the top of the 10-foot ceiling. (Yes, we have one of those long sticks with a hook on it to reach those clothes. But you can still get a crick in your neck trying to get them down and hang them back up.)

Anyway, it seemed like a lot of space when it was totally empty. Over the past three years though, we've had to make a few additions to accommodate all of our stuff and utilize the space better. 

1)  We added another wooden rod below the existing shelves (on the left side) for more hanging clothes (all mine, of course).


2)  We bought two shoe racks from Walmart (I think they were $10 each) to utilize the space underneath the shelves on the other side of the closet (behind the door). This is great because we can see all our shoes; but on the downside, they can get dusty if they're not worn for awhile.


3)  We bought a little organizing rack from Home Depot (about $10) to hang on the wall beside the door. It fits just right and holds ties, belts, and necklaces that were previously scattered haphazardly around the closet.

Our shelves were also getting pretty scary as of late, especially on my side, so I cleaned them up a bit and put some old clothes that I never wear anymore in giveaway sacks. I also organized some other random items into shoeboxes to stack on the shelves. I felt much better about our closet after that, which was what led me to this [somewhat boring] post.


It hasn't been a total overhaul by any means, but these small changes have helped our closet from looking like a complete disaster. What are some of your best closet-organizing tips? If you have a closet makeover to share, leave the link in your comment!

Sunday, February 28, 2010

Do two people really need this much food?

I always thought our pantry was a pretty decent size -- a definite upgrade from the non-existent pantry we had when we lived in our apartment. Well, as it turns out, the more space you have, the more you buy to fill it up!

Awhile back, I bought some little wire racks at World Market in an attempt to better utilize the height of the shelves, and that helped for awhile. But every time we stock up on sale items -- like I did on my most recent grocery shopping trip -- it gets a little more out of control in here. It doesn't help that we also have to dedicate one of the shelves to small appliances, since we don't have enough cabinet space in the kitchen.


If you were ever curious as to what we eat, now you know.

Things are just stacked and piled on top of each other wherever they fit, and it takes some digging to find what we want. Plus, stuff gets buried and we forget about it until we discover it much later. It's very depressing when you're really craving some popcorn, only to find out the box you have is a year past its expiration date. I ain't messin' with that.

So I finally got sick of staring at these cluttered shelves every time I opened the pantry door, and took a visit to Home Depot to see what storage solutions I could find. Luckily, they just happened to have two of these 3-tiered wire racks left, at about $11 each, a price I could definitely stomach.

I snatched them both up, of course. They may not be the most glamorous, but this project was all about function, not style. The racks came with anchors, screws, and plastic clips for mounting, but those anchors weren't going to work for our hollow pantry door. So we took a trip to Lowe's, where we had previously seen anchors made specifically for hollow-core doors. Genius! 

The anchors worked pretty well, except some of them tore up the door a little bit. Oh well, it was covered up with the mounting clip anyway.
 

After about 45 minutes, the racks were installed!


Of course I wasted no time sorting through our shelves and deciding how to best fill those gleaming white racks. I didn't want anything too heavy on them, so this is what I ended up with:

And here are our newly organized pantry shelves:

Maybe you can't tell much of a difference, but I know I can!

For under $25, we were able to add much more functional space to our pantry. Now that we can find things easier, maybe we'll also waste less money on expired food that we end up tossing.

Do you have any pantry problems? 

Thursday, January 28, 2010

"Glossy Situation" Update!

*** BORING POST ALERT ***

You might remember not too long ago I posted about magazine organization. I got a lot of great comments from readers who seem to have the same problem with hoarding magazines (thank goodness).

Well, I thought I'd give a quick update on some progress I've made in that area ('cuz I know you've just been dying to find out). The other day I was at Wal-Mart and ran across some magazine holders that were marked down (err... "rolled back") from $6 to $4.50 each. Not bad, considering the prices I've seen of some other fancy mag holders! There were only 4 brown ones left, so I just grabbed 'em all. I figured it was meant to be.

So instead of baskets overflowing with stacks of magazines that you have to dig through....


I now have these handy-dandy holders in our living room, guest bedroom, and office. 

Such a simple change, but I feel so much more organized! But once all my new holders get full, I might have to force myself to recycle some old issues (only tearing out and saving articles that really interest me, as some people suggested).

Hooray for specialized storage solutions!

Hey, don't say I didn't warn you this post was gonna be a boring one :)

Tuesday, January 19, 2010

A Glossy Situation

Inquiring minds want to know... or at least this girl's does:

 What do you do with all your magazines? I currently have several subscriptions... InStyle, Bon Appetit, House Beautiful, and Better Homes & Gardens. I also buy the occasional glossy off the rack when something in particular strikes my fancy.

I keep some of my magazines at work to read over lunch hour, and the rest here at home in baskets (which are starting to get a bit unruly). 


I think there are probably more buried in a box or storage bin somewhere in this house. Someday I'll go through them and recycle all of the really old ones, but I still like keeping most of them on hand. I guess I always think that I'll want to refer back to something, even though I rarely do. 

So, do you keep your magazines? Toss them? Recycle them? Organize them in magazine holders like these?


Do you display them out in the open, or hide them away in a closet somewhere? I've also thought about just tearing out only the articles that interest me and keeping those in a file. Maybe I would be more likely to give them a second look later on... 

I don't want to accumulate any more clutter than necessary, so why do I find it so difficult to part ways with all my mags??

Please divulge your storage solutions!

Saturday, January 2, 2010

Never underestimate the power of Rubbermaid

While Hubby was helping out his parents on a project of their own today, I took the opportunity to tackle a project that we've been putting on the back burner for months. It involves storage and organization, which Hubs isn't too fond of anyway. Since our dungeon basement is unfinished, we're mainly using it for four purposes right now: 
1) A game room (consisting of a dart board, ping pong table, and a crappy craigslist pool table)
2) A place for Phoebe's food and litter box
3) Laundry
4) Storage
And by "storage," this is what I mean:

This is just one of several areas of our basement that looks like this, but it's probably the messiest. No rhyme or reason to anything whatsoever. Since we moved in, we've pretty much been using the laundry "room" as a place to throw store mostly Christmas stuff, but also packing materials, random crap that we don't want to deal with, and empty cardboard boxes of all sizes. Lots of boxes. Boxes within boxes. Why do we need so many boxes? It's as though we're hoarding them in case there's a worldwide box shortage someday. But seriously, you never know when you're going to need a good box, right? Anyway, I digress.

It all started innocently enough, as I was just planning on putting away a few Christmas decorations today. Then I decided - especially since it's a new year - that this would be the perfect time to do some major re-organization. I ran all over Walmart like a madwoman, grabbing as many storage containers as I could. Turns out they're a hot commodity right now, as I had to go to a couple different Walmarts to find what I needed. (And somehow I also managed to accidentally knock a few more 75% off Christmas decorations into my cart...oops.)
But the real fun started when I got home. After several hours of this (which Phoebe was turning into her own personal playground):

I finally achieved this:

The transformation is even more impressive in person, but you can see quite an improvement here. I never thought I'd buy special containers just for wrapping paper and a wreath, but they make such a difference! Necessary? No. Genius? Yes. Much more attractive and sturdy than a plastic bag or a cardboard box. I also brought down the green plastic drawers that weren't being utilized very well in one of our closets upstairs. They now house our tissue paper, gift bags, and other miscellaneous gift wrapping materials. And thanks to a Sharpie and some white labels, it's easy to tell what's what. You'll notice there are fewer empty boxes in the corner, too. I managed to throw a few of the crappy ones away, consolidated some of the smaller ones, and put the rest up in our storage loft in the garage. 'Cuz you just never know...

I feel so much better after accomplishing this feat. This is life-changing, people! Ok, not quite, but it's up there. We still have a lot of other boxes to go through in the basement, but this is a big step, and totally worth the $45 in storage containers! (I also bought 4 other plastic tubs that I haven't even used yet.) And now I don't have to cringe every time I go do a load of laundry. 

Do you have any major organization plans in your near future?

LinkWithin

Related Posts with Thumbnails