
Sooo, it's been nine months since my last blog post. Although given my track record the past couple years, that should come as no surprise to anyone. But I'm determined to get somewhat caught back up and start sharing projects more regularly here, even if they seem small and insignificant. (Don't hold your breath though.)
That said, I'm going to ease back into this with a look at our latest DIY project: a butcher block desk. Keep reading below for the details!
We've had two very large slabs of oak butcher block sitting in a spare room for several years (yes, years) now. They were left over from our kitchen countertop project, because we originally bought enough for a waterfall-style breakfast bar, which we did not end up doing.
So anyway, last month we finally came to terms with the fact that we were never going to get around to making a built-in desk for an office downstairs (our original grand plan when we moved into our house)... so the butcher block now seemed like the obvious choice for creating a minimalist standalone desk. And, given that I have been working from home (due to the Covid-19 pandemic) for the past seven weeks using our dining room table as my workspace... I was beyond ready for a real, grown-up desk in an actual dedicated home office.
Here's the unfinished slab cut to size for the desktop (72" x 31"). And no, this was not a fun piece to haul in and out of the house.

After a good deal of hemming and hawing about what color to stain the desktop, we decided to go with Minwax Jacobean. I've used this stain before on other projects and really like it. But we didn't want it to be as dark as usual, so I just did a very light coat by putting a little bit of stain on a rag and rubbing it thoroughly into the wood, but not letting any excess sit there. This made for a more weathered look and allowed all the variation in the wood to come through.

After the stain was dry, I sealed the wood with Rustoleum water-based polyurethane in a matte finish. Since a desktop needs a really smooth surface, I ended up doing 6 thin coats (very lightly sanding between each one). Luckily the dry time for each coat was only an hour so the whole poly process didn't drag on too terribly long.
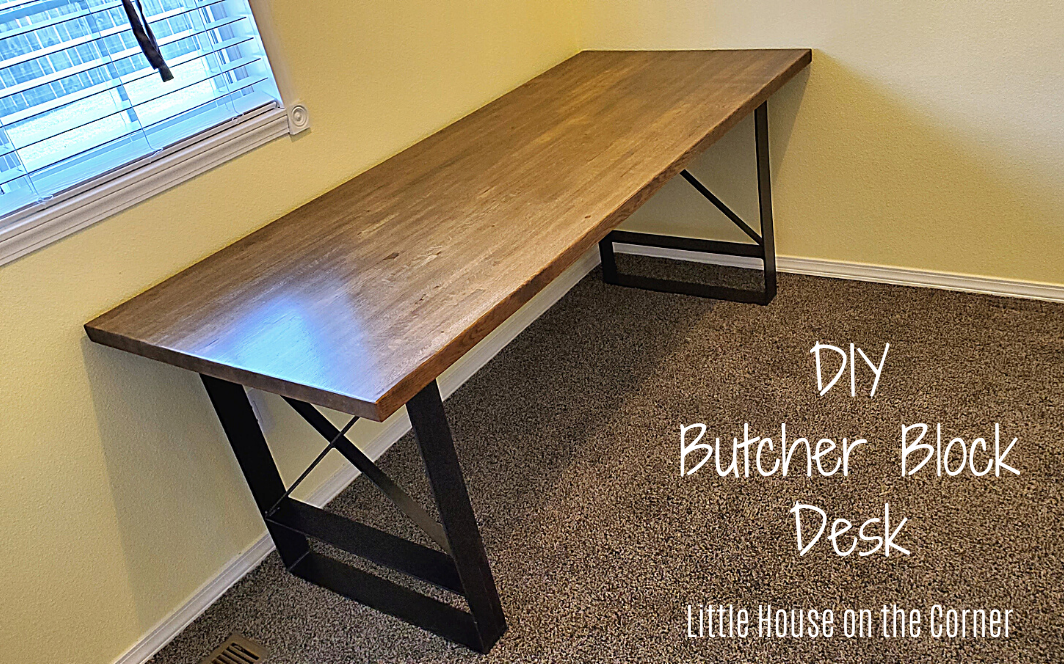
Now, the legs for the desk was another agonizing decision. In general, we knew we wanted some simple steel legs, but it turns out there are a lot of Etsy shops who offer many variations of this style. After much comparison, we ended up going with these steel legs from Csonka's Custom Rustics. The "X" cross bracing added a nice touch, and since each set is custom made, we were able to specify the exact dimensions needed.

Sexy pair of legs, aren't they?

Securing the legs to the table was quite simple — just marking the placement and then using 6 lag screws for each leg.


Voila! The finished desk.
For as simple a project as this was, it was incredibly satisfying. (Maybe because we haven't had a legitimate office desk for 7 years now? And because it usually takes us weeks or months to complete any project?)

In case you're wondering, the desk is super sturdy (and super heavy).

Side note: I've never been much of an indoor plant person, but lately I've been trying to incorporate them more (and keep them alive). I must say, it does help freshen things up.
Side note #2: I swear this buttery yellow paint color looks good in real life, especially with the natural daylight coming through the window. Unfortunately it's tricky to capture the true color in photos.

It feels so good to finally have a dedicated office space now, and I actually prefer it here on the main floor rather than the basement where we had originally planned. And we can finally leave the door to this room open with no shame, because it's not a cluttered storage space anymore! Hopefully this project will give us the momentum we need to keep rolling and making progress elsewhere in the house... To be continued.

NOTE: Little House on the Corner is a participant in the Amazon Services LLC Associates Program, an affiliate advertising program designed to provide a means for sites to earn advertising fees by advertising and linking to amazon.com.

5 comments:
Welcome back to blogging! It's great to see you're sharing your DIY projects again. Looking forward to more inspiring posts from you.
In case you need info about hooker furniture collection take a look at here.
This DIY Butcher Block Desk project is fantastic! It not only adds a rustic touch to your home office but also showcases your creativity and craftsmanship. The versatility of butcher block makes it perfect for any workspace. If you're looking for space-saving solutions, consider pairing it with small corner desks to maximize your office's functionality and style. Great job!
Versatile
This office desk made a huge difference in my productivity. It’s well-built and fits perfectly in my office!
Post a Comment