Sunday, June 26, 2011

My weekend workout with a bunch of studs

No, I'm not talking about hunky men (except for my husband, of course). These studs:

For those of you who were starting to think that my blog was turning into a cooking blog instead of a DIY blog (not that there's anything wrong with that), this is proof that we've had some real projects going on around here. This weekend, I hauled all these 2x4's down to our basement (while Luke was busy prepping/planning/measuring). At least I'm good for something! You can't tell from the picture above, but it was also a 100+ degree day. Just sayin'. So about an hour and a liter of sweat later, I finally had all 51 of them downstairs.


Yes folks, this means we are actually, seriously starting on our basement! There's been a bit of a lull since our concrete/plumbing work several weeks ago (hence all the recipes I've been posting), but things are picking up again. Hopefully I'll be able to show off a wall (or two) soon!

But in the meantime, don't be surprised if you see another recipe from me.  ;)

Wednesday, June 22, 2011

Recipe of the Week: Fruit Salsa

Now that it's officially summer, I thought it quite appropriate to post this great summer-time recipe, which I happened to make this past weekend. It’s so easy and so delicious - especially during strawberry season!

Fresh Fruit Salsa
1 lb. strawberries
1 cup raspberries
2 golden apples
4 kiwis
2 tbsp. sugar (or more to taste)

Dice all fruits and mix together in large bowl. Add sugar and stir well. Chill at least 15 minutes.  (I have also used a food processor to pulse the fruit on low speed a few times until it’s not quite pureed but still chunky.) You could also add any other type of fruit you want (peaches, mango, papaya, pineapple, etc.)


Sweet Tortilla Chips
10-inch flour tortillas
Butter spray (I used Parkay)
Sugar with cinnamon mixed in to taste

Spray tortilla shells one at a time with butter spray. Sprinkle cinnamon/sugar mixture over tortilla shell. Coverage can be thick or thin, depending on personal taste (I use a lot). Spray again with butter spray (this will give them a nice crusty yumminess). Use a pizza cutter to cut tortillas into wedges or strips. Spread on single layer on baking sheet. Bake at 350 for 10-12 minutes (or until golden brown and crispy). Cool slightly before serving.


The chips are good enough to eat on their own, but dip them in the salsa and oh my! Everyone loves this stuff. And that’s about all I have to say about that. The pictures speak for themselves!


What are your favorite summer-time snacks?


Monday, June 13, 2011

Personalized Nursery Letter Art

You may be wondering why I would be doing a project for a nursery. Well..... I have some news to share......

Just kidding! No, we are not having a baby. However, a couple of our good friends just became proud new parents of a baby boy (three weeks ahead of schedule). I knew I wanted to do some sort of DIY project for their gift, and I had been thinking along the lines of a personalized photo frame.

Then, I came upon the perfect idea while visiting Hennessy House. I wish I could take credit for myself, but I have to give Sarah all the props; this girl has creativity oozing out of every pore! Seriously, you should see her artwork. Normally I am both impressed and intimidated by her talents, but this letter art actually seemed like something I could attempt to re-create myself.

Basically, the idea is to trace a bunch of different stencils to create the shape of a letter. For a good, detailed tutorial, just check out Sarah's post. In her case (below), she used it as a wedding gift.


I, however, was visualizing it in a nursery. Since my friend's nursery has what I would call a sophisticated/modern jungle theme (it's really adorable), that made it pretty easy. I had no trouble finding various elephant, giraffe, and hippo silhouettes on Google Images. I also used a photo of the wall in the nursery to get the silhouette of the simple tree that also matches the tree in her fabrics. Then I printed off all the silhouettes in a variety of sizes.


The baby's name is Elijah, so I found a nice chunky font (Berlin Sans) for my letter "E"and blew it up to about 700 point size for an 8x10 frame. After tracing the outline of the E onto tracing paper, I proceeded to trace my silhouettes inside the letter. It was kind of like putting a puzzle together, trying to decide where they fit best. And although it was time-consuming, I thought it was pretty fun.


I wanted to make a couple different versions to see which one I liked best, but ran out of time and just went with my first attempt. Here's what it looked like as outlines only:

Then, I scanned in the tracing paper, printed it off on regular white paper, and colored in the silhouettes with a black Sharpie. (You could also just use the fill tool in Photoshop to color in the outlined shapes, but this way felt more "handmade.") Here's what it looked like when I scanned it in again:
In Photoshop, I erased the outline of the E, darkened the silhouettes by adjusting the levels, and just cleaned up the image in general. There was also a little blank hole that needed filling, so I added the date of Elijah's birth.
I found this silvery frame at Walmart, which I spray painted with Rustoleum American Accents satin finish in Iris Blue.


Then I just printed out my letter art on matte photo paper, and voila!


I think Sarah's version looks better, but overall I'm pretty happy with mine. This is such a great gift idea -- inexpensive, yet it still requires effort and creativity. With that said, you don't have to be an artistic genius, just have a little bit of patience.

And the season of giving continues...


Pin It


Linking up to....
Motivate Me Monday
Anything Related Tuesday
Amaze Me August
Look What I Made! (Creations by Kara)
Whatever Goes Wednesday
What I Made Wednesday (Sweet Peas and Bumblebees)


     Weekend Bloggy Reading

Monday, June 6, 2011

'Tis the season of giving

Graduations, weddings, and babies, oh my! Anyone else finding their summer booking up quickly? And then there's the gift shopping... (Whoever said Christmas is the season of giving?!)

This weekend was a baby shower for one of my friends, and the wedding of one of my college roommates. Of course, gift registries make it easy to find something that you know they'll like. And I definitely make use of those registries most of the time! But I also like to try to put just a little extra effort into my gift-giving. (Remember my gift baskets from last Christmas?) Don't get me wrong, sometimes I'm such a last-minute shopper that I have to shove everything into a gift bag -- no tissue paper or anything -- and call it good.

Problem: For the baby shower, I purchased several little random items from the registry, and I didn't want to wrap them individually or throw them in a storebought gift bag.

Solution: Assemble a fun (and inexpensive) gift basket.

White gift basket from World Market: $4
Yellow shred from Walmart: $1
Gift basket bag from Hobby Lobby: $2

Since the bag was clear and you could pretty much see everything inside (which kinda takes away from the surprise factor), I also tucked some squares of different-colored tissue paper around the basket. Add some curled ribbon and a balloon, and voila!


Problem: For the wedding shower gift, I purchased a glass canister set off of the registry. Perfectly fine by itself and it's already packaged in a box which makes wrapping easy, but it still seems a little...boring.

Solution: Since the canisters will most likely be used for some kind of food storage, include some favorite recipes as a bonus.

I went through my recipe binder and picked out 8 of my current, tried-and-true favorites (several of which I've blogged about). I typed them out, printed them onto white cardstock, and cut them into cards. To make them a little more sturdy, I took the cards to work and laminated them (which will also make it easier to wipe off splatters). Then I punched a hole in the top corner of each card and used a little key ring to hold them all together. It still seemed to be lacking something, so I tied some ribbon onto the ring to add a little color.

I thought this "booklet" would be a nice idea because everyone has to eat, and therefore everyone can use recipes, right? You could definitely get more elaborate with this and use prettier paper, more recipes, etc.


What do you do to add a personal touch to gifts? Do you go by the registry or take a risk and "off-list" it?

Tuesday, May 31, 2011

Coming out of the closet

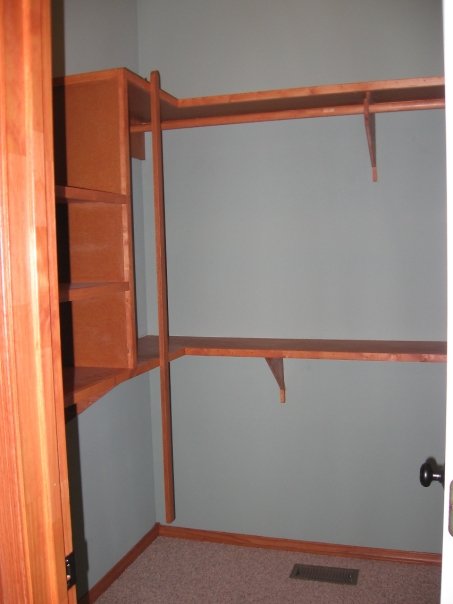
No, not that closet. This closet:


The closet off of our master bathroom is pretty decent sized. It's a walk-in at least, so I guess I shouldn't complain. Still, we've managed to fill it to capacity, and then some (Luke blames that all on me, of course). I thought I had taken more photos of the closet before we moved in, but I could only find the one above. It doesn't really show much, but hopefully you get the idea.

Basically, there were (and still are) open shelves on all three walls, with one rod against the back wall for hanging clothes. And you can't see it, but there's also a rod on each side way up near the top of the 10-foot ceiling. (Yes, we have one of those long sticks with a hook on it to reach those clothes. But you can still get a crick in your neck trying to get them down and hang them back up.)

Anyway, it seemed like a lot of space when it was totally empty. Over the past three years though, we've had to make a few additions to accommodate all of our stuff and utilize the space better. 

1)  We added another wooden rod below the existing shelves (on the left side) for more hanging clothes (all mine, of course).


2)  We bought two shoe racks from Walmart (I think they were $10 each) to utilize the space underneath the shelves on the other side of the closet (behind the door). This is great because we can see all our shoes; but on the downside, they can get dusty if they're not worn for awhile.


3)  We bought a little organizing rack from Home Depot (about $10) to hang on the wall beside the door. It fits just right and holds ties, belts, and necklaces that were previously scattered haphazardly around the closet.

Our shelves were also getting pretty scary as of late, especially on my side, so I cleaned them up a bit and put some old clothes that I never wear anymore in giveaway sacks. I also organized some other random items into shoeboxes to stack on the shelves. I felt much better about our closet after that, which was what led me to this [somewhat boring] post.


It hasn't been a total overhaul by any means, but these small changes have helped our closet from looking like a complete disaster. What are some of your best closet-organizing tips? If you have a closet makeover to share, leave the link in your comment!

Monday, May 23, 2011

How to grow a flower really fast

Aside from the occasional recipe to mix things up a little, most of the projects I've been blogging about lately have involved working with dirt and concrete. As fun as that is (insert sarcastic tone here), I have been feeling the need to make something pretty.

With that said, this little project is hardly worthy of a post, because it was so painfully simple. Trust me, I'm well aware of that. Quite frankly, it would be a insult to crafty people to even call it crafty. But I like how it turned out, so now you get to read about it!

Cute brown ceramic container from the local garden center - $8


Green hydrangea stem from Hobby Lobby - $4 (half off, of course)


Square of floral foam placed in container - $1


Cut the stem off the hydrangea, stick it into the foam, and fill around it with some landscaping rock to hide the foam.


Now I have a lovely "permanent" flower that doesn't need to depend on me to keep it alive. Even though I'm pretty fond of the brown & green color combo, it will also be easy to switch out the flower with something else when I get tired of it.

Hey, it's better than looking at more pictures of dirt and concrete, right?


Wednesday, May 18, 2011

The seeds have been sown...

If you're a regular reader around here, it's no secret that I have a pretty bad track record with keeping plants alive. Nevertheless, that hasn't quelled my urge to try my hand at growing vegetables. So when the opportunity arose recently, I took it.

Our sidewalk project left us with a rectangular strip of dirt that was just begging to grow something. Remember what it looked like back here before the sidewalk? Let's reminisce...

Yeahhh.... pretty trash-tastic.

So once the sidewalk and resulting landscaping bed were completed, I figured there was no better time to attempt to be a gardener and plant some veggies. But first, I had to clean up the post-sidewalk mess:

Bricks, boards, concrete chunks, more bricks, potted daylilies, snow fence, and more bricks.

So after a couple hours of moving everything out of the way and tilling up the soil, I finally had an area to work with. (I ran out of places to put all the brick, so just had to line it up around my "garden"...maybe I'll actually put a brick border here someday?)


I decided to get zucchini, cucumber, and green beans. Hopefully they are all pretty easy to grow for a novice like me. I have no idea if this is enough space to be planting all these things, but I guess I'll find out. I feel like I've been told that the cucumber plant spreads a lot.... Anyway, after studying the directions on the seed packets, I got out my little hand shovel and got to work.


As it turns out, there are a lot of seeds in these packets, and I didn't end up using them all. Maybe that means I should have a bigger garden than this? I probably put them too close together as it is.

This picture looks pretty much the same as before, but the labeled flags are there as proof that the seeds have been planted.


I think seedlings are supposed to sprout in about a week or two, so now I just have to play the waiting game. And, more importantly, remember to water them. If they all grow, then I'll have some veggies ready to harvest in about 50-60 days. And if not, then I guess I only wasted about $8 on the seeds. 

Do you have any experience growing vegetables? What do I need to know?

LinkWithin

Related Posts with Thumbnails