Tuesday, May 31, 2011

Coming out of the closet

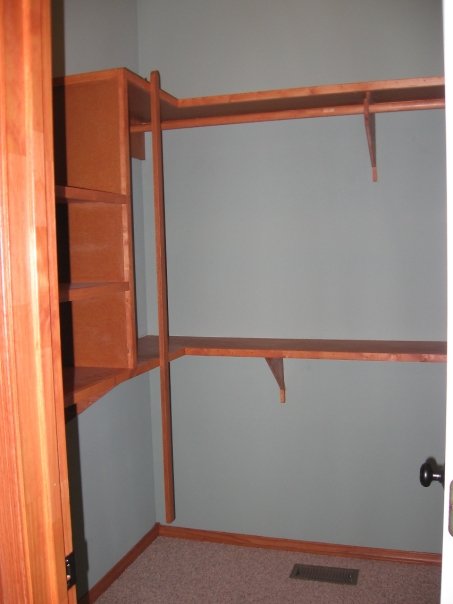
No, not that closet. This closet:


The closet off of our master bathroom is pretty decent sized. It's a walk-in at least, so I guess I shouldn't complain. Still, we've managed to fill it to capacity, and then some (Luke blames that all on me, of course). I thought I had taken more photos of the closet before we moved in, but I could only find the one above. It doesn't really show much, but hopefully you get the idea.

Basically, there were (and still are) open shelves on all three walls, with one rod against the back wall for hanging clothes. And you can't see it, but there's also a rod on each side way up near the top of the 10-foot ceiling. (Yes, we have one of those long sticks with a hook on it to reach those clothes. But you can still get a crick in your neck trying to get them down and hang them back up.)

Anyway, it seemed like a lot of space when it was totally empty. Over the past three years though, we've had to make a few additions to accommodate all of our stuff and utilize the space better. 

1)  We added another wooden rod below the existing shelves (on the left side) for more hanging clothes (all mine, of course).


2)  We bought two shoe racks from Walmart (I think they were $10 each) to utilize the space underneath the shelves on the other side of the closet (behind the door). This is great because we can see all our shoes; but on the downside, they can get dusty if they're not worn for awhile.


3)  We bought a little organizing rack from Home Depot (about $10) to hang on the wall beside the door. It fits just right and holds ties, belts, and necklaces that were previously scattered haphazardly around the closet.

Our shelves were also getting pretty scary as of late, especially on my side, so I cleaned them up a bit and put some old clothes that I never wear anymore in giveaway sacks. I also organized some other random items into shoeboxes to stack on the shelves. I felt much better about our closet after that, which was what led me to this [somewhat boring] post.


It hasn't been a total overhaul by any means, but these small changes have helped our closet from looking like a complete disaster. What are some of your best closet-organizing tips? If you have a closet makeover to share, leave the link in your comment!

Monday, May 23, 2011

How to grow a flower really fast

Aside from the occasional recipe to mix things up a little, most of the projects I've been blogging about lately have involved working with dirt and concrete. As fun as that is (insert sarcastic tone here), I have been feeling the need to make something pretty.

With that said, this little project is hardly worthy of a post, because it was so painfully simple. Trust me, I'm well aware of that. Quite frankly, it would be a insult to crafty people to even call it crafty. But I like how it turned out, so now you get to read about it!

Cute brown ceramic container from the local garden center - $8


Green hydrangea stem from Hobby Lobby - $4 (half off, of course)


Square of floral foam placed in container - $1


Cut the stem off the hydrangea, stick it into the foam, and fill around it with some landscaping rock to hide the foam.


Now I have a lovely "permanent" flower that doesn't need to depend on me to keep it alive. Even though I'm pretty fond of the brown & green color combo, it will also be easy to switch out the flower with something else when I get tired of it.

Hey, it's better than looking at more pictures of dirt and concrete, right?


Wednesday, May 18, 2011

The seeds have been sown...

If you're a regular reader around here, it's no secret that I have a pretty bad track record with keeping plants alive. Nevertheless, that hasn't quelled my urge to try my hand at growing vegetables. So when the opportunity arose recently, I took it.

Our sidewalk project left us with a rectangular strip of dirt that was just begging to grow something. Remember what it looked like back here before the sidewalk? Let's reminisce...

Yeahhh.... pretty trash-tastic.

So once the sidewalk and resulting landscaping bed were completed, I figured there was no better time to attempt to be a gardener and plant some veggies. But first, I had to clean up the post-sidewalk mess:

Bricks, boards, concrete chunks, more bricks, potted daylilies, snow fence, and more bricks.

So after a couple hours of moving everything out of the way and tilling up the soil, I finally had an area to work with. (I ran out of places to put all the brick, so just had to line it up around my "garden"...maybe I'll actually put a brick border here someday?)


I decided to get zucchini, cucumber, and green beans. Hopefully they are all pretty easy to grow for a novice like me. I have no idea if this is enough space to be planting all these things, but I guess I'll find out. I feel like I've been told that the cucumber plant spreads a lot.... Anyway, after studying the directions on the seed packets, I got out my little hand shovel and got to work.


As it turns out, there are a lot of seeds in these packets, and I didn't end up using them all. Maybe that means I should have a bigger garden than this? I probably put them too close together as it is.

This picture looks pretty much the same as before, but the labeled flags are there as proof that the seeds have been planted.


I think seedlings are supposed to sprout in about a week or two, so now I just have to play the waiting game. And, more importantly, remember to water them. If they all grow, then I'll have some veggies ready to harvest in about 50-60 days. And if not, then I guess I only wasted about $8 on the seeds. 

Do you have any experience growing vegetables? What do I need to know?

Monday, May 16, 2011

It was bound to happen eventually...

You’ll probably start seeing another face around these parts, so I thought it was time to make a formal introduction. Meet Roxy, the newest member of our family:


We have been contemplating getting another dog for awhile and finally bit the bullet. Roxy is a 10-month-old boxer that we adopted from the humane society on May 1. (We're not sure if she's pure boxer or has anything else in her... They had her labeled as a boxer "mix" but they label every dog as a mix!) Roxy has managed to adjust pretty well here in her new home over the past couple weeks, and she’s a total sweetheart, all 40 pounds of her. She likes to come up and rest her head on our laps and gaze up at us with her big brown eyes.

So how are Roxy and Dudley getting along, you ask? Well, it did take him a few days to adjust to having another dog around. She’s more mild-tempered, and he can be overbearing and obnoxious at times. We’re trying to make sure he still gets plenty of attention to keep feelings of jealousy at a minimum. They have similar playing styles and like to rough-and-tumble a lot. At the end of the day, when they end up looking like this...


Or this...

Or this... 

Or this...

...it makes us feel like we made a good decision.

And I didn’t waste any time finding a use for this photo frame (found on clearance at Target for $6) that had previously been lying on the floor in our office for months:


Three photos for our three pets! Guess that means we can't get any more now.  :)

Saturday, May 7, 2011

Coconut caramel ice cream sundae, anyone?

I thought that might get your attention.

Every once in awhile, I’ll come across a recipe in Bon Appetit magazine that doesn’t intimidate me with fancy, expensive, hard-to-pronounce, and/or obscure ingredients. And so far, the few that I’ve actually tried have turned out pretty good. Or in the case of this particular recipe (from the June 2009 issue), freakin’ delicious!

photo via bonappetit.com

I had been wanting to try this Toasted-Coconut Caramel Sauce for quite awhile and finally got around to it a couple of weeks ago. (Since then, I’ve actually made it a second time.) The great thing is that it uses basic ingredients that you probably already have on hand, and if not, they’re easy to find at the store. Here’s my experience:

Ingredients
1 cup sugar
¼ cup water
1 cup heavy whipping cream
¼ cup sweetened cream of coconut* (Coco Lopez brand is the best in my opinion)
1 ¼ cups sweetened flaked coconut
1 ½ pints purchased French vanilla ice cream (any style of vanilla ice cream will do… just make sure it's a quality brand!)

* found in the liquor section of the supermarket

Directions
Place sugar and 1/4 cup water in heavy deep medium saucepan. Stir over medium-low heat until sugar dissolves. Increase heat to high. Boil until mixture turns dark amber, occasionally swirling pan and brushing down sides with wet pastry brush, about 9 minutes. The 9 minutes seems to be pretty reliable, so set a timer or watch the clock. You’ll be able to tell when it’s the right color. Remove from heat. Immediately add cream and sweetened cream of coconut (mixture will bubble vigorously). If you’re like me, you might end up with a big glob of sticky caramel right away. Don’t freak out. Whisk over low heat until caramel sauce is blended and smooth and any caramel bits dissolve. It takes several minutes of stirring and breaking apart the glob into smaller pieces, but it will all dissolve eventually. DO AHEAD Can be made 1 day ahead. Cool, cover, and chill. Rewarm slightly over medium heat, stirring often, before using.

Preheat oven to 350°F. Spread coconut evenly on small baking sheet. Bake until golden brown, stirring every 3 to 4 minutes, about 12 minutes. Cool. I’ve learned to watch the coconut closely while it’s baking, so it doesn’t end up burnt. The coconut on the outer edges tends to get darker quicker in my experience. DO AHEAD Toasted coconut can be made 4 hours ahead. Let stand at room temperature.

Scoop ice cream into bowls. Spoon some of warm caramel sauce over. Sprinkle toasted coconut over and serve immediately.


I was amazed that this sauce turned out so good the very first time I tried it. It actually looked and tasted like caramel (with a slight coconut flavor from the cream of coconut). We took it over to a friend’s house and everyone raved about it. One of our friends also happens to be a really good cook, so his positive review was even more appreciated! He was also impressed that it didn’t require a candy thermometer. I guess that’s why the 9 minutes is really important. Even Luke, who isn’t a coconut fan, really liked the toasted coconut on top. Along with the yummy taste, it adds a nice crunchy texture (and makes a pretty presentation!)


 I’m sure there are lots of other sinfully delicious ways this caramel sauce could be put to good use (drizzled on brownies? a dipping sauce for apples?), although the ice cream topping has to be one of the best. I’m thinking it would even make a great homemade gift idea – just make a couple batches and put it in cute little jars (as long as the jars get refrigerated right away).

If all the sauce doesn’t get devoured immediately, it keeps well in the fridge for several days. You can reheat it slowly on the stove or in the microwave on low power.

As far as desserts go, this one is pretty easy and is sure to be a hit! Take my word for it, everyone will be impressed with your caramel-making skills. So…is your mouth watering yet?

Weekend Bloggy Reading      Anything Related    Photobucket

Wednesday, April 27, 2011

Concrete is Really Heavy.

How do I know this? Because I had to shovel it into about 50 buckets and lift them into this window well to fill in our basement hole.


Let's backtrack. We originally had scheduled the concrete truck to deliver on a Saturday, when we would have had five total people to help us move it. But we found out the Friday before that they didn’t have enough deliveries to work on Saturday, so it had to be postponed until the following Monday at 7:30 a.m. Thankfully, my parents were still able to come and help us out, or else there was no way we could have done it. My dad already had a lot of helpful tools (edger, groover, wood float, finish trowel, square shovel, wheelbarrow), so the only thing we had to buy was a magnesium float. Woot!

Since traipsing through the house and down the stairs with buckets of concrete was not exactly desirable, the only other reasonable alternative was taking it down through the aforementioned window well. So we loaded wheelbarrows from the truck, and my mom and I shoveled it into buckets to hand to Luke.


We got concrete with fiberglass mesh in it (which acts as a reinforcer), since that was what was originally used in our basement. It kinda looks like it has a bunch of tiny hairs in it.


Luke got the crappy end of the deal, since he was the one on the ladder who was taking them down through the window. And it’s not that I’m not confident in his brute strength or anything, but I found myself secretly praying that he wouldn’t fall backwards every time I handed him another bucket.

Oh, did I mention that we only had one hour to unload all our concrete before they started charging us $1 per extra minute? No pressure to get it done quickly or anything…..

Meanwhile, my dad was working on smoothing and finishing the concrete until it was flush with the existing slab. I couldn’t see what was going on down there, so I had Luke snap a couple of pictures. Looks like Dad knows what he’s doing!


Once we had finally shoveled our last bucket, our work was not yet done. We still had an 18-foot-long sidewalk to pour. Although Dad had some experience with finishing a sidewalk years ago, we all gave ourselves some good ol’-fashioned YouTube education in advance.


The sidewalk pouring went much quicker since we were able to dump the full wheelbarrows directly into our formwork instead of hassling with buckets. We started doing this while Dad was still working away in the basement.


After we had pretty much filled the formwork, we realized that was probably not the smartest decision, since Dad would now have to step in the concrete to screed it, instead of screeding and filling at the same time. But we managed to make it work. Good thing he had some heavy-duty Muck Boots on. After screeding with a 2x4, he used the wood and magnesium floats and finally the finish trowel. (Sidenote: I had no idea it was spelled "screed" until I looked it up. What a weird word.)


It was already looking good, but it really began looking like an honest-to-goodness sidewalk once they started the edging and grooving to make the control joints (which allow for expansion and contraction due to temperature changes). Luke and Dad had a pretty good system going, but since the sidewalk was so wide, it was quite a reach to get over to the other side. Rather than fashioning some sort of harness to hold onto Luke, it was easiest for me to just grab onto his shirt to keep him from falling in the wet concrete. Oh, the things one must do when DIY-ing….


Classy.

By noon-ish, the sidewalk was just about finished. Not bad for a morning’s work! We did try putting Dudley’s paw prints in it, but I thought they looked kind of sloppy, so we smoothed them back out. Then Luke tried writing "2011" in it, and that didn’t look so good either. Maybe it had already started to harden too much. Anyway, we ended up leaving our sidewalk impression-free. A few hours after pouring it, it was already hard enough that I couldn’t even make a dent in it with my finger.


Once we cleaned up all our tools, we took Mom and Dad out for cheeseburgers at Five Guys Burgers and Fries (their request), and they headed home. Later that day, Luke and I put a plastic “tent” over the sidewalk since there was rain in the forecast. Providing some extra sun protection also helped the concrete from drying out too fast, which apparently can cause premature cracking.


As excited as I was about our basement hole finally being filled, I just wanted to keep looking at our sidewalk. Who knew watching concrete dry could be so exciting? However, it’s probably not as exciting for you, so I will refrain from posting all the photos of drying concrete... after this one, I mean.


Oh, in case you’re interested, we unloaded the truck in about 1 hour and 15 minutes. (In fact, we probably didn’t use all the concrete we ordered.) But the delivery guy said they wouldn’t worry about charging us for the 15 extra minutes. He was really nice!

Concrete Cost Breakdown for Sidewalk & Basement Floor:
Formwork: About $20
Fibermesh Concrete: $132.75 for 1.5 cubic yards
Delivery Charge: $100 plus $8.75 fuel surcharge
Magnesium Float: $15
Labor: paid in cheeseburgers and fries


We’re probably going to take a little break before starting any major construction in the basement, but it’s just exciting to know that our bathroom now has a floor again! Just to clarify: Hole in the wall = good. Hole in the floor = bad.

Anyway, I’m off to go check out our sidewalk again. Thanks again, Mom and Dad!


P.S. Pouring your own sidewalk? Here’s a pretty good tutorial, since mine wasn’t actually very explanatory. If we can do it, you can do it!

LinkWithin

Related Posts with Thumbnails