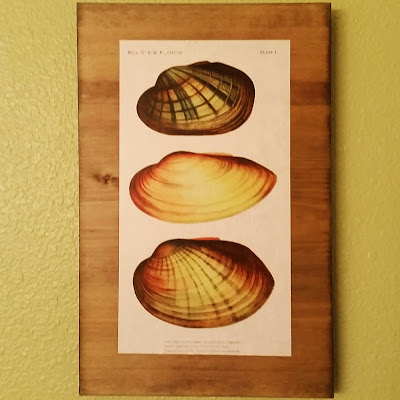
This is one of those things I've had on my to-do list for several weeks now, but I finally had the time, motivation, and materials to get it done over Memorial Day weekend. One of the other reasons it took so long to get started was that I didn't exactly know how to bring my vision to life. I hadn't seen any specific examples of what I wanted to do. But I'm happy to say that it turned out beautifully in the end! And, I have to say right off the bat that the total cost was less than $5!!!
Let me rewind just a bit. It all started when I was thinking about how to decorate our hall bathroom. We have 10-foot ceilings and there was a large expanse of wall above our towel rack just crying out for attention.
I'm really digging beach/sea-themed decor right now, and after some searching I found these vintage-looking sea printables via Pinterest. I knew they would be perfect, and the colors would look great with our bathroom walls (which are painted Behr Mojito). I printed them out on regular paper on a laserjet printer (*cough cough* at my office). I'm not even sure if the images were high-resolution, but they looked pretty decent to me once printed.
However, the size of these pictures (about 5" x 9") didn't match a standard frame size, so there was my obstacle. I'd either going to have to make my own frames or figure out some other creative way to display them. I looked at several stores to see what other photo display options there were, and they either didn't work or were too expensive. After more brainstorming, I decided I'd just Mod Podge the printed images right onto four pieces of wood. Simple enough.
I found a piece of "common wood" at Home Depot for less than $4. In fact, it was exactly $4 with tax. The width was just perfect for what I needed, and the length gave me a little extra to spare in case I messed something up! I think the wood is actually just pine (according to my hubby). Anyway, he helped me cut it into four pieces which were about 7" x 11" each, so that I'd have roughly an inch border around the edge.
Actually my husband cut the first one, and then I cut the other three.
And managed to keep all of my fingers in the process, thankyouverymuch.
But there were still more decisions to make, like what color the wood should be. Since the background of the prints was already very light, I decided against painting it white. I already had some Ebony stain on hand, but didn't want it to be quite that dark. While perusing Pinterest for inspiration, I found this blog post describing how to instantly "age" new wood using a vinegar/steel wool mixture and brewed tea. I was immediately intrigued and knew this was the effect I wanted! If it didn't turn out right, at least I would only be out $4 for the cost of the wood.
I won't go into detail about the process here, because Jeanette did a great job on her blog. I followed the instructions exactly, so just go read her post at Country Design Style if you want a step-by-step rundown! :) In any case, the faux aging process worked like a charm. Here's the test piece I tried first, so you can see the difference compared to the natural wood.
Impressive, right? It was the perfect weathered brown color to complement my vintage-y prints! After seeing the success of my test scrap, I dove right into "staining" the four larger pieces. After a few hours to allow for drying, I added a thin coat of Minwax Wipe-On Polyurethane in a satin finish for good measure.
Once the poly had dried, it was time to apply the prints. I used a foam brush to wipe a coat of Mod Podge onto the back of the paper, then pressed it down onto the wood, doing my best to smooth out any wrinkles and bubbles. Then I brushed another coat on top of the paper and also onto the wood around the edge. I wanted to make sure it had a good protective layer since it would be in a bathroom with occasional humidity from the shower. Here's how it looked when the Mod Podge was still wet:
I let all of the pieces dry overnight, so by then the Mod Podge had turned clear with a nice satin finish. You could see the brush strokes up close, which I actually like.
It was all coming together -- maybe even better than I had imagined! The only thing left to do was add sharktooth hangers to the back, and mark the placement on the bathroom wall. When I did my stairwell gallery wall a few years back, I learned the easy way to do this by taping up paper templates as a guide for where to put your nails.
Finally I was ready to hang up my finished "artwork." It was a bit of a challenge to get photos at different angles in our small bathroom (yes, I did stand on our toilet and in the shower), but here's the final result!
And a close-up of each one!
Did I already mention the cost of this project was under $5?!?! Of course, it helped that I had everything on hand except the wood. But even factoring in the cost of the other items--vinegar, steel wool, tea bags, and Mod Podge--this is a pretty inexpensive project.
I'm also really glad about discovering the "aged wood' technique, because I have a feeling it'll come in handy again someday!
What do you think about my project? When was the last time you had to get creative about displaying photos or artwork? I'd love to hear from you!


No comments:
Post a Comment