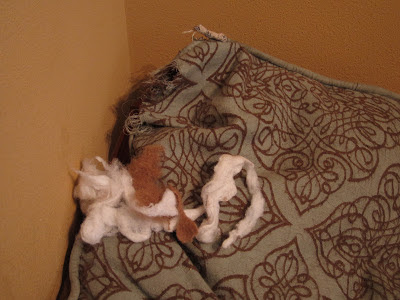
My latest DIY project was one born of necessity, not
just the urge to be crafty. And it wasn’t even to benefit me – it was for the
fur-kids.
We have a boxer and a big mutt (I say that with love),
and at about 45 pounds and 75 pounds respectively, they require a sizable dog
pillow. In fact, up until recently we had one 30” x 40” pillow for each dog, which took
up a lot of space on the floor of our small living room. And half the time, they just
ended up squeezing onto the same pillow anyway (they love to snuggle).
Overall, our dogs are pretty good about not chewing things up. But something must have gotten into them because they started chewing on one of the corners during the day
while the hubby and I were at work. And once they discovered the stuffing
inside, it was all over. We would come home to pillow guts all over the living
room. Not good.
The other pillow also had raggedy corners and was wearing thin in the middle, so it was in bad shape too. Something needed to be done, but I didn’t just want to go
out and buy another pillow (or two). First of all, those big pillows get expensive.
Second of all, I wanted just one pillow that would be bigger than 30” x 40” yet
smaller than having two 30” x 40” pillows.
A couple of weeks ago I conveniently stumbled upon this pin featuring a great tutorial for a DIY dog pillow. Better yet, a no-sew DIY dog pillow! The
basic premise was to cut slits all around the edges of two fleece blankets,
then tie the slits together. All I needed to find was a couple of blankets,
since I could just re-use the stuffing from our existing pillows. The cheapest I
found was at Wal-mart for a whopping $2.88/ea. Score!
I laid the two blankets on top of each other and got started cutting my slits. This part was pretty darn easy, and I wasn’t even precise about measuring my
cuts (width or length). The hardest part was
trying to keep two very curious and determined dogs from laying on the
blankets while I was trying to work. My efforts were futile, so I eventually just gave up.
Once I was done cutting, I just tied both layers together
on three sides (that part took awhile and gave my fingers a good workout). Then I proceeded to pull all the stuffing out of the old pillows
and transfer it into the new pillow. Finally I tied the remaining side shut.
A little lumpy, but it would do the job.
The dogs were digging it already (especially Dudley), but I wasn’t foolish
enough to just call it good at this point. All those ties were just begging to be
tugged at and ripped back open. I needed a pillowcase of sorts, but it needed
to meet two criteria: Removable (for washing) and close-able (to prevent the
dogs from discovering/destroying the
inner purple pillow). It was time to get more creative with my no-sew skills. (Yes, I realize that my life would be much
easier if I would just buy a sewing machine and learn to sew.)
I knew my trusty Steam-A-Seam would come in handy for
three of the sides, but I had to figure out a way to open and close the
remaining side. I don't have any experience with zippers, much less "no-sewing" a zipper, so the next logical
solution in my mind was Velcro. I went to Michael’s to check out all the different
types of Velcro, and lo and behold I found one that was especially for no-sew
projects. Good thing they make these kinds of products for non-seamstresses
like me! Since it was a specialty
Velcro, that also meant it was more expensive than the standard stuff: about $13 for a 5-foot roll. But, it
was exactly what I needed.
Finally, I had to find the fabric for my cover. I
rummaged through the clearance table at Hancock Fabrics and found a basic cotton fabric for about $2/yard. It was denim-colored with a fun leopard print. (I could have bought something more durable but I
didn’t want to spend a lot of money in case I screwed it up or in case
the dogs destroyed it.)
Back at home, I measured out my fabric and cut two
rectangles big enough to cover the pillow. It was time to rekindle my deep and
meaningful relationship with my iron as I steamed all three seams shut with the
fusible webbing.
Then I followed the directions to iron on the Velcro to the remaining side on each piece of fabric, basically creating a flap. This probably took another half hour. After letting it all cool down for a bit, the bond seemed pretty strong when I gave it the ol' tug test.
So I anxiously stuffed the purple fleece pillow inside the pillow case and
pressed the Velcro together. Voila!
Not too shabby for a makeshift, no-sew
doggie bed! And more importantly, it’s
plenty big for Roxy and Dudley, who both gave it their seal of approval right
away. I think they were just happy to have a new pillow again.
Since I already had the Steam-A-Seam and pillow stuffing
on hand, here’s the
Budget Breakdown:
Blankets - $6
Velcro - $13
Fabric - $6
Total - $25 (for a pillow approximately 46” x 50”)


1 comment:
I think it turned out pretty great. I'm not sure learning to sew would save you much time... You still have to measure, cut, assemble, blah, blah... I hate ironing, so for me it's easier to sew.
Post a Comment