Wednesday, December 8, 2010

Christmas came early!

A package arrived in the mail for me last week. What is it, you ask?


A few weeks ago, I was contacted by a couple of lovely folks representing 3M. To celebrate the launch of 3M's new ScotchBlue Painter's Tape with Edge-Lock Paint Line Protector, they asked if I'd like to try the product out on my next painting job and review it on my blog. Umm, let me think about this... Yes, please!! As if it wasn't a no-brainer already, I had a painting project looming in my near future anyway. Perfect timing!

Back to the package. Lizzy and Tomi (the aforementioned lovely folks) were kind enough to send me not just the ScotchBlue Painter's Tape, but an entire painting kit! Complete with a sample of paint, a brush, roller cover, roller tray, wire roller frame, two nap roller covers, and three rolls of ScotchBlue Painter's Tape with Edge-Lock Paint Line Protector. How awesome is that?!

AND, as if that wasn't enough, the kit included the book "Decorative Paint Techniques and Ideas," which is filled with a plethora of painting techniques and finishes. (Some of which are a little intimidating to a novice painter like me, but the step-by-step instructions and photos give me hope that even I could master them!)

Be still, my heart.

I'm totally stoked about all this because I desperately needed a new paintbrush too. Just look at this embarrassing mugshot of our old brushes, with their frazzled, frayed, and fatigued bristles.


I know what you're wondering now. What's this painting project I've got lined up? It's not big as far as size, but I think the impact will be big! Our hall bathroom has been bugging me for awhile. The reddish-brownish color itself isn't so bad -- in fact, it's the same color used in our hallway and staircase -- but I think it's too dark for such a small space, especially when you have to use the shower.
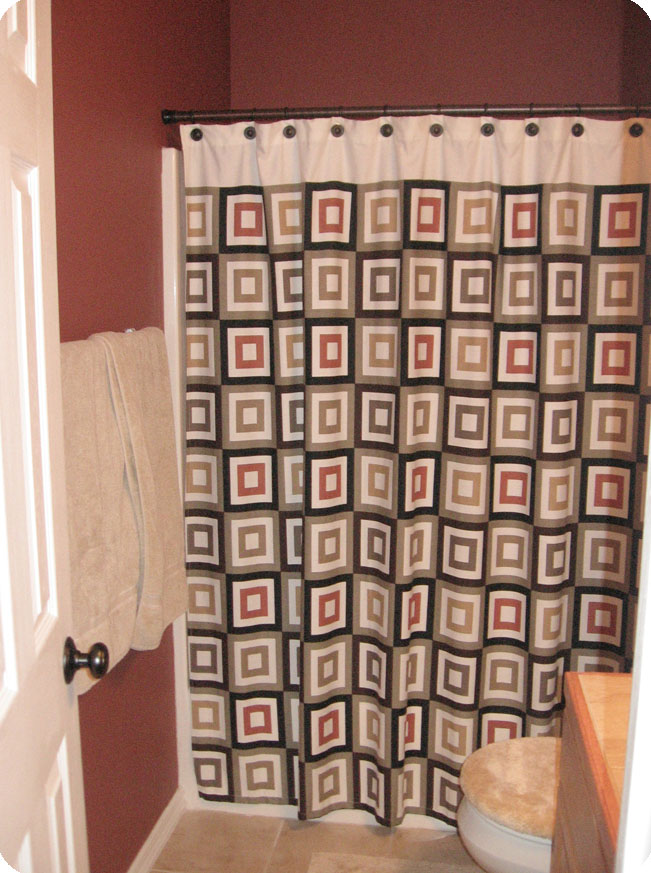

Yes, we have 10-foot ceilings. That helps the space appear bigger, but those corners are still awfully dark!

Knocking out a hole in the exterior wall and putting in some glass blocks for extra light would be nice, but not practical right now. A different light fixture might also help, but I don't want to spend that money. That leaves a fresh coat of paint as the easiest and cheapest solution to brighten things up in here. I haven't decided if I should pick a color that still complements the shower curtain, or something different that would call for a new shower curtain... Right now the sink is covered in paint swatches. What I do know there's lots of trimwork, etc. that needs to be taped off, so you can expect a full review of the ScotchBlue Painter's Tape!

Aaaannnnddd, for those of you are still following along, I'll soon be hosting a GIVEAWAY -- generously sponsored by Lizzy and Tomi with 3M -- for a roll of ScotchBlue Painter's Tape with Edge-Lock Paint Line Protector! And there will be multiple winners! Just wanted to make sure I got your attention there.

So, have I given you enough reasons to stay tuned yet?  :)


** Painting kit was provided to me free of charge from ScotchBlue, in exchange for an honest review of their product.

Sunday, December 5, 2010

Holiday Cinnamon Stick Candles

Since I missed out on last week's Dare to DIY party over at Newly Woodwards, I was determined to join in the fun again this week! The theme is homemade gifts--very convenient, since I plan on putting together a few gift baskets this Christmas... a plan that hopefully doesn't turn out to be overly ambitious. To avoid last-minute stress, I tried to get a head start this weekend by making one of the items.

These cinnamon stick candles have been on my growing list of "DIY Projects I Want to Copy" for quite some time, and I thought they'd make a nice addition to a holiday gift basket. The idea is courtesty of the ultimate craft queen herself, Ms. Martha. It seemed easy enough, so I headed out to Hobby Lobby for my supplies.

3" x 6" Pillar Candles - $2.50/ea  (@ 50% off)
Decorative Cinnamon Sticks - $0.98/bag (@ 50% off... in the Christmas section)

Despite the perceived ease of the project, I naturally ran into a snag right away. The hot glue was just melting the candle and wouldn't stick to it (which makes perfect sense, really). After re-reading Martha's instructions, I realized it said to use a low temperature setting to minimize melting. Oh. Apparently my glue gun isn't high-tech enough to have a low temp setting, so I had to figure something else out.

Solution: Wrap a wide piece of ribbon tightly around the candle and glue the overlapped section to secure it. (It should be something pretty, in case it peeks through the sticks when you're done.) Now, I had a surface that my cinnamon sticks would adhere to. After that, it was pretty simple... Run hot glue across the sticks and press them all around the candle! Toward the end it took a little advanced planning to make sure I didn't end up with a gap.

They look good no matter which side of the sticks faces out.


The final touch: Tie a pretty piece of ribbon around the candle, which the recipient can keep on or take off. (I thought of that without Martha's help, thankyouverymuch.) Raffia or even jute would also look nice if you're going for a more natural vibe.


This really was an easy (and thrifty) project, just a little time-consuming. And because of the cinnamon sticks, the candles smell good even when they're not lit. I plan on making a few more, and probably one for myself! If you do try making these, I found that one bag of the small cinnamon sticks from Hobby Lobby is almost enough to cover an entire 3" diameter candle.   However, if you're planning on making a lot of these (or any cinnamon stick craft for that matter), it might be more cost-effective to get your cinnamon sticks in bulk:


What kind of homemade gifts do you like to make (or receive)? If you want even more ideas, be sure to check out Kim's Dare to DIY party!


Pin It

NOTE: Little House on the Corner is a participant in the Amazon Services LLC Associates Program, an affiliate advertising program designed to provide a means for sites to earn advertising fees by advertising and linking to amazon.com.

Friday, December 3, 2010

CSN Stores Product Review

After doing two CSN Stores giveaways in the past, I've decided to take up CSN Stores on their offer to do a product review instead. I know, greedy me! There are a mind-boggling number of items to choose from, and so many things that I could use. In case you haven't heard of them by now, CSN Stores has over 200 online stores with everything from counter height stools to cookware, or even handbags and shoes for all you fashionistas out there.

After browsing the Web site for entirely too long and still not scratching the surface, here are just a few of the things I'm contemplating....

Wall display shelves (there are a plethora of styles)...

 
(found here and here)


A new, nature-y bedding set for our bedroom...
  
(found here and here)


A springform pan (just in time for holiday baking)...
(found here)

Or maybe even a fun accent table to hide our unsightly and growing stash of dog supplies!

(found here)


I'm going to try and make a decision soon, so stay tuned. And if you have an urge to do some online shopping or still have some Christmas gifts to buy, you should definitely check out CSN Stores!

Tuesday, November 30, 2010

Window Woes

I hope you all had a wonderful Thanksgiving! Christmas decorating is in full swing here now, so you can expect to see all of that soon (although there's a bit of a preview up in my header). But, first things first.

I was trying to hold off on posting about our living room windows until I had actually done something to them. But obviously -- as our "temporary" paper blinds can attest to -- that's not happening. Yes, it's been two and a half years and these $5 blinds are still hangin' on, long past their intended life span.

(Yes, that would be Phoebe in her favorite spot. And yes, I need to replace a light bulb.)

It's a little embarrassing, because I've become so used to them that I almost forget they're not real window treatments. I mean, they've got these nifty plastic clips to fold them up and everything. Classy, right?

But I just know that our living room would feel so much more homey if we had real blinds or even curtains. I just can't decide what to do!

The windows in our office and master bedroom also have paper shades, but no one sees those as often and I think they'll be easier to tackle. Sadly, there are only two other windows in our entire house that have been appropriately dressed:
Entryway
Guest bedroom

Both these windows were rather large, but the only real difficulty was finding 96" curtains instead of the standard 84" length, and that wasn't really all that hard. But this wall of windows in our living room has been far more intimidating. 


So, I need some window covering counseling from my fellow stylish and thrify bloggers. What would you do? Blinds? (Wood or faux? White or matching the trim?) Roman shades? Curtains? Any inspiration photos to share? Something must be done, if not just for aesthetic enhancement, then at least to add a little more of a barrier between the drafty windows and us (especially now that winter is right around the corner).

And obviously it would be ideal if this project could be done on the cheap. If it comes down to DIY, I may not be able to sew, but I can Steam-A-Seam!

Oh, and for what it's worth:
- These windows are south-facing (so it's nice during the winter when we can let some sun in).
- The loveseat under the windows pretty much has to stay put. Our living room is small and our three big pieces of furniture only fit a certain way. *sigh*

Tuesday, November 23, 2010

Last-minute Thanksgiving Recipe

The past couple of years, I've made creamed corn and pumpkin bread for the office Thanksgiving potluck. This year, I wanted to bring something different, but it also had to be something quick, cheap, and easy. While browsing through All Recipes (my favorite go-to resource), I came upon this recipe for cranberry sauce. Obviously, cranberry sauce is not a new concept to the Thanksgiving menu, but I've never tried making it before. This recipe sounded too easy to pass up (or screw up). And it only took three ingredients, two of which I already had on hand. Here's my experience:

In a medium saucepan over medium heat, dissolve 1 cup sugar in 1 cup orange juice.

If I'm not mistaken, a lot of cranberry sauce recipes just use water and sugar, so I think the orange juice adds a little something special here. And of course, cranberry & orange is a great flavor combo anyway.


Stir in 12 ounces of cranberries and cook until the cranberries start to pop (about 10 minutes). 

This part of the recipe was a little alarming to me, having never cooked cranberries before. What happens when cranberries pop? Would they explode and squirt scalding cranberry juice in my face? Would this require some form of protective eyewear? I decided to err on the side of caution and just covered my pot with a lid. Sure enough, after a few minutes, I began to hear popping noises. It wasn't as scary as I thought it would be, but definitely noticeable. I moved the lid aside just enough to stir them around every once in awhile.


Remove from heat and place sauce in a bowl. Cranberry sauce will thicken as it cools.

I took the pot off the burner after about 12 minutes, when I wasn't hearing any more popping, and it appeared that most of the cranberries had burst. The sauce looked frothy and runny.


After my taste test, I'd say it was a success! Tart yet a little sweet, and you can taste the hint of orange. I spooned it into a white bowl to set off the red color. This cranberry sauce would make a great addition to any Thanksgiving or Christmas table! In my opinion, much better than cranberry sauce out of a can (not that there's anything wrong with that).


Happy Thanksgiving, everyone!  Stretchy pants, here I come!


* Notes: I bought the bag of Ocean Spray fresh cranberries in the produce section, but there might be frozen ones, too. Also, I doubled the recipe (2 cups/2 cups/24 oz).

Sunday, November 21, 2010

Thrifty Thanksgiving Tablescape

While I'm not hosting Thanksgiving at our house this year (I haven't achieved that status in the family hierarchy yet), that doesn't mean I can't pretend! As part of the Dare to...Entertain blog party over at Newly Woodwards, I got in the Thanksgiving spirit this weekend and staged my own tablescape. Therefore, keep in mind it's only for looks and not necessarily function.  :)

With that said, if I were a holiday hostess this year, my Turkey Day table might look a little like this...

Rather than using all the same plates, I mixed it up with two different styles (which were conveniently perfect colors for fall). It's a little more fun that way. I think the stemless wine glasses add to the casual feel, too.


You might notice that one important thing I'm missing is some fancy cloth napkins. Well, I don't own any, and a roll of paper towels on the table just wouldn't have had the same effect.


To dress up the silverware, I got a little creative. *pats self on back* I took some wide ribbon I had just bought on sale at Wal-Mart ($2.50), rolled it around the silverware, and tied a piece of raffia around it. Voila!

I didn't feel like using spoons. Remember... pretty, not practical.


The leaves scattered on my no-sew table runner were plucked off of a clearance garland (also from Wal-Mart). For $1.50, they look realistic enough for me!


My centerpiece consists of elements from various stores (Hobby Lobby, Wal-Mart, Z Gallerie) that I managed to assemble into something pretty decent. All in all, I think it cost around $10.


Finally, I had to get my $12 wreath from Home Goods in the background. We added a small hook on the top of our mirror, and I just hung it with raffia. It's perfect for fall!


I have to admit, it was pretty fun to set my Thanksgiving table, even though it won't be put to use. Thanks for the idea, Kim! So I might leave it like this for the next few days, just because I can.

More gratuitous "ambience" photos:


 Are you hosting Thanksgiving this year?


Sunday, November 14, 2010

Deconstructed DIY Advent Wreath


While Christmas is still a month and a half away, the season of Advent starts right after Thanksgiving! Admittedly, I've been guilty about overlooking Advent in years past; I get wrapped up in decorating and stressing out about Christmas shopping just like everyone else (not that there’s anything wrong with that). I meant to get an Advent wreath last year but never got around to it. For anyone who is unfamiliar with the whole history and symbolism of the Advent wreath, I won’t pretend to be some sort of religious expert. Instead, here are a couple good articles:
What is the Advent Wreath? (About.com)
The History of the Advent Wreath (Catholiceducation.org)

This year, I thought it would be fun to try and make my own. Here’s one example of a traditional wreath:
[ image credit: Catholiceducation.org ]

The two purple candles are lit on the first and second Sundays of Advent. The pink candle is lit on the third Sunday, and the final purple candle is lit on the fourth Sunday. And there’s usually a white candle in the center to be lit on Christmas Eve, too. When you light the candle(s) each week, you should take some time to appreciate this season and its meaning.

I thought about just recreating this look, but then decided to put my own little twist on it. I perused the Christmas and candle aisles at Hobby Lobby for materials and found these:


Candle ring - $3.49 (50% off)
Mirror base - $2.99 (50% off)
White pillar candle - $2.49 (50% off)
Pink and purple(ish) votives - $.99/ea
Votive holders - $.60/ea (from Wal-Mart)

I couldn't find the right colors of pink and purple votives, but got the closest I could. I decided to go with these instead of taper candles because I felt they would look better and not get knocked over. After assembling everything, this is my deconstructed advent “wreath” on our dining table:


If you know me, you know I’m drawn to sparkly things like a moth to light, so I couldn’t resist the temptation to add a glitzy touch with the candle ring. And I like how the mirror adds a reflective quality and helps to ground it. Although I did realize after reading through this article that I’m missing the evergreen element, which is supposed to symbolize life. Oops. It's pretty, but maybe lacking a little meaning.

So, when I was shopping at Home Goods this weekend (while visiting my sister; unfortunately we don't have one where I live!), I found a 12" wreath--complete with berries, pine cones, and ice crystal-tipped garland--for $12.99.  Substitute the mirror for a new charger from Z Gallerie ($2.95), and I now have this:


Which version do you like better?


The garland wreath has a nice, full look to it. And I can always use the other candle ring elsewhere in the house. But since it's not Advent yet, I still have a couple weeks to decide. For now, it's back to my simple fall centerpiece!


NOTE: Little House on the Corner is a participant in the Amazon Services LLC Associates Program, an affiliate advertising program designed to provide a means for sites to earn advertising fees by advertising and linking to amazon.com.

LinkWithin

Related Posts with Thumbnails