Pages

Thursday, December 3, 2020

Master Bathroom Makeover Part II: The Reveal

I thought this day might never come, but I'm finally ready to share the official "reveal" of our DIY master bathroom makeover. It's been months in the making — a weekend here, a weekend there, you know how it goes. The polished chrome towel bars still haven't been switched out yet, but who knows if I'll ever get to that.

So, is this my dream bathroom now? Well... no. But, it's a vast improvement and much-needed freshening up. All in all, we achieved a big transformation with a fairly small budget (I think we stayed under $1,500).


Keep on scrolling for all the photos and more details!

Before: Dark & Drab


After: Lighter & Fresher!


To be honest, it all looks much better in person. There's no natural light and our bulbs are on the warm side, so it's challenging to get great photos. And, my camera phone was struggling to focus and capture the detail on the distressed cabinets. (Excuses, excuses...) Anyway, here's a brief rundown of the updates which have taken place over the past few months:


Painting the walls Colonnade Gray by Sherwin Williams


Tearing out the old grouted tile countertop and backsplash
(and destroying some drywall in the process)

Patching the drywall, spraying the texture and repainting

Installing a new solid white countertop with integral sinks

Installing new faucets


Though it was a fairly tedious project, painting the vanity instead of getting a brand new one saved us a good chunk of money. Another cost-saving decision was keeping our existing mirrors, light fixtures and cabinet hardware, since they mostly still coordinated with the new updates. Also, we obviously didn't replace the flooring either — that was just way more than we wanted to get into at this point.


Neither one of us was too familiar with the Kraus brand before this, but it turns out these faucets are really beautiful and high-quality. The brushed gold is almost more of a champagne color.


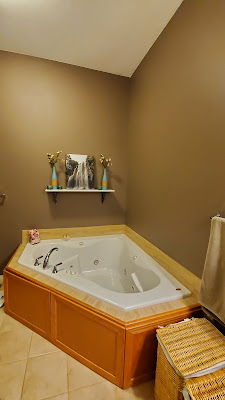
This shelf has been here for years, but now the vases and canvas print stand out much more against the light gray walls. 

I'd love to hear what you think about the new paint colors and other updates! If it were your bathroom, how would you have transformed it on a budget?


Sunday, November 8, 2020

Entryway Makeover with Hanging Wall Planters

 The wall behind our front door has been long overdue for a makeover. Like, it was really bothering me every time I looked at it. The color scheme in our house has gradually been transitioning to a lot of aqua accent colors, so this green/orange/purple combo just wasn't working anymore. And in general I just get bored of things and am always looking for an excuse to make a change.


Step One was to refinish the console table with chalk paint and dark wax, which you can read more about here. As you can see I also did some "shopping" around the house and found some beach-themed decor for the table.


Step Two was finding something to replace the three medallion mirrors. I knew I wanted to incorporate plants somehow (either real or faux), so I began searching Amazon for hanging wall planters. After too much time spent deliberating between all the options and styles, I finally decided to get these unique white ceramic flower planters.


Well, that meant I had to find something to hang them on, as a regular nail wouldn't do the trick. But I also didn't want a big bulky hook. Hello again, Amazon. Another search led me to these gold decorative wall hangers. (They also came with anchors and screws.) I was pleasantly surprised with the quality once they arrived. It was a set of four, even though only three were needed for my purposes.


After enlisting hubby's help with installing the hooks, the planters were ready to hang! 


As I'd hoped, the three planters fill out this wall space perfectly. They're not too big, and not too small. The back side is also flat so they don't stick too far out from the wall which was an important consideration. I dig the leather strap and brass screws, don't you?


Surprisingly my existing craft stash didn't include any flowers that worked well for these planters, so a quick trip to Hobby Lobby was in order. (I actually haven't been there in a very long time.) Luckily it happened to be the last day to get 50% off the floral category. Originally I thought I might get some succulents, but in the end I decided on three dahlia (?) stems for a very budget-friendly total of $12. Each large stem had three flowers on it, which I cut and arranged in the planters. Easy peasy.


You could get really creative with floral/succulent arrangements in these planters, but obviously I took the quickest and simplest route for immediate gratification. Also, in case you're wondering, there's no drainage hole in them. But according to the product description, adding a handful of small rocks and or charcoal to the bottom is an easy way to give excess water somewhere to go to prevent live plants from drowning.


Finally, the makeover is complete! All the pieces and parts came together quite nicely. Not only does it look more cohesive, it feels more sophisticated too. (As an added bonus, our front door wreath also ties in well) The overall cost for this entryway makeover was only about $50 for the planters, gold "hooks" and faux flowers. I purposely got flowers that will look appropriate year-round, but it would also be easy to switch them out for Christmas stems or other seasonal decor. Versatility is always a good thing in my book!


Sunday, October 25, 2020

Console Table Chalk Paint Makeover - Quick & Easy!

What's a girl to do after she's painted all the things in her house? Start repainting, of course.

This little console table was a $25 thrift find several years ago. When I bought it, it was hunter green with a lighter oak stained top. I repainted it using a white latex paint and gloss finish, along with refinishing the top with a walnut stain. 


Recently I've gotten the itch to change up our entryway wall, so it was the perfect excuse to give this table another facelift. The white's fine and dandy, but I'm just bored with it. And since I've started using chalk paint pretty much exclusively on any cabinets and furniture, I knew this could be a pretty quick project. Mainly because chalk paint requires virtually no prep and dries quickly. So, after wiping the dust off the table, I just painted right over the existing gloss finish.

Normally for larger projects (like our kitchen cabinets and bathroom cabinets) I opt for the more pricey Annie Sloan chalk paint. But for this small table I just used Buttercream brand Teal Lagoon (because I still had about half a bottle after using it to refinish this small cabinet a couple years ago). It took two coats to get good coverage over the white.


Once the paint dried, I wiped on some clear wax since this that's supposed to help the dark wax apply more evenly. Then, I wiped on dark wax in sections, let it sit about 20 seconds, then wiped it off. The dark wax really tones down the bright paint and gives it an antiqued effect. With this Teal Lagoon color in particular, the wax also seems to bring out more green/aqua tone which I prefer.


Voila! Finished in one evening for immediate gratification, and it's just the look I was wanting. The table ties in nicely now with a few other pieces of "distressed aqua" furniture we have. It wouldn't take someone long after walking into our house to realize that this is one of my favorite colors.


Next I'm going to replace the circle medallion mirrors (another DIY project from way back when we had more of those colors in our decor) with three white wall planters that I just bought off Amazon. Stay tuned for the next phase of this little entryway makeover!


Tuesday, September 29, 2020

Master Bathroom Makeover: Part I (Lots of painting!)

I'm trying to remind myself that I don't always have to wait until finishing a DIY project to blog about it. I mean, let's face it, it's usually weeks or months from beginning to "end." And for my latest project (our master bathroom makeover) that's certainly the case. With that said, here's a progress update!

Back in July, I started painting all the walls. The old color was Tree Branch by Sherwin Williams (don't ask why I chose this color in the first place).


The new color is Colonnade Gray by SW. Bye bye, brown!


Maneuvering the ladder in the toilet room was one of the worst parts. But it doesn't feel like a dark cave in there anymore!


A few weeks after the walls, I worked up the motivation to start painting our vanity. Chalk painting is my go-to method for transforming cabinets without paying for brand new ones (see our kitchen makeover and hall bathroom makeover). This time, however, I got much more adventurous and ambitious with my technique than past projects. What did I have to lose? Anything would be an improvement over the orange-y oak stain.

My initial goal was to achieve some kind of aqua/turquoise color that would complement the walls and existing tile floor (which I'm not a fan of, but definitely not replacing it). After a great deal of experimenting on scrap wood with color mixing, layering and waxing, I finally came up with a winning combination.

  • First, I painted on a layer of Annie Sloan Florence. This color is bold and beautiful. I want to use it again someday for a smaller accent piece, but for this vanity it made a good base color.
  • For the second layer, I mixed together French Linen and Provence with some water to create a color wash and lightly brushed that on.
  • I distressed the edges by wiping a damp cloth along the edges to remove some of the paint.
  • Once everything was dry, I applied clear wax followed by dark wax, which was then wiped off to create an antiqued effect. 
First coat...


Color wash...


Lightly distressed edges...


Antiquing with dark wax...


Of course, these were just the doors and drawers. I also had to do the same thing to the rest of the vanity, which was more tedious with all the taping. As you can see, I was too impatient/lazy to even take out our toiletries.


When this all began, I thought I might end up spray painting or even just replacing the hardware. But once I saw the end result from the chalk painting and waxing, our existing hardware color (an antiqued brass) was actually perfect for this new look. Score!


Since then I've also painted the wood panels of our jetted tub using the same process. And we've ordered a new all-white countertop with integral sinks from Home Depot, as well as two brushed gold faucets that should tie everything together nicely. My hope (at the risk of jinxing something) is that we'll have all that replaced within the next month and can officially check this master bathroom makeover off the list! Stay tuned...