Pages

Wednesday, July 8, 2015

Christmas in July (?!)


For me to be thinking of Christmas in July is practically unheard of. And actually being prepared enough to buy gifts this early?  Ha! (Although, have you heard about Amazon Prime Day on July 11?? This might be good incentive to get that Christmas shopping done early. But I digress…)

Despite my aversion to thinking about the winter holidays during summer, I’ve come to realize that “Christmas in July” is actually a pretty big thing. There are promotions and Instagram hashtags dedicated to it. I also found this website which attempts to explain the history of Christmas in July, if you feel like some extra reading. 

Sunday, June 14, 2015

Gray Matters: A Gray Paint Transformation (Part II)

So it occurred to me that I teased about my new gray paint job way back in November, and then never blogged about it again. Whoops. Bad blogger, bad! I'm sure you were all losing sleep over it, right? Not to worry, my friends. Seven months later, here is the full reveal!

You can visit Part I to see the 'before' pictures, but here's a little collage as a quick reminder. Our walls used to be a very warm beige (almost gold?), with a dark reddish hallway and stairwell. Those were the colors the interior was painted when we bought the house as the first owners. 


Ten gallons of paint later, the transformation was complete. I loved it then, and I'm still really happy with it. It feels fresh, modern, and airy. Because I've already drug this out long enough, here are the after pictures!

Tuesday, May 26, 2015

Vintage Sea-Inspired DIY Wall Art

I know. The title of this post is kind of a mouthful. But that's the best way I can describe this project. And since the last project I blogged about was admittedly kinda lame (albeit functional), I promise this one will make up for it! Consider that your warning for a long post with lots of pictures ahead.  :)

This is one of those things I've had on my to-do list for several weeks now, but I finally had the time, motivation, and materials to get it done over Memorial Day weekend. One of the other reasons it took so long to get started was that I didn't exactly know how to bring my vision to life. I hadn't seen any specific examples of what I wanted to do. But I'm happy to say that it turned out beautifully in the end! And, I have to say right off the bat that the total cost was less than $5!!!

Let me rewind just a bit. It all started when I was thinking about how to decorate our hall bathroom. We have 10-foot ceilings and there was a large expanse of wall above our towel rack just crying out for attention. 

I'm really digging beach/sea-themed decor right now, and after some searching I found these vintage-looking sea printables via Pinterest. I knew they would be perfect, and the colors would look great with our bathroom walls (which are painted Behr Mojito). I printed them out on regular paper on a laserjet printer (*cough cough* at my office). I'm not even sure if the images were high-resolution, but they looked pretty decent to me once printed.


Sunday, May 3, 2015

DIY Birthday Reminder

I know there are Smartphone calendars and Facebook to remind us of everything these days, but sometimes it's nice to have a tangible reminder right in front of you. At least, I think so. 

Don't you hate it when someone's birthday sneaks up on you and you're rushing at the last minute to find a card or gift? Or, if you're like me, you married into a big family and have a lot more birthdays to remember! For us, fall especially gets busy and overwhelming. In September and October, there are 10 birthdays. 

While perusing Pinterest, I've come across a couple ideas for cute reminders that aren't in digital form. And after a little shopping trip to Hobby Lobby, I had the materials to make my own:

- Hanging hook wall decor thing-a-ma-bob
- Gold shiny Thickers (I love these things)
- Tiny paper clips

Overall the cost was less than $10. 


I thought it would be kind of quirky to put the word "bday" on the wall decor, instead of spelling the whole thing out. Plus, it was fewer letters to have to line up straight.  

Then, I printed out all of the birth dates of family/friends on cardstock and cut each month out. After punching a hole at the top of each one, I just used a paper clip to hang it on the hook. Instead of hanging it on the wall, I decided to put it on the fridge in our kitchen, so I glued some magnets on the backside. 


Now, we really don't have an excuse to forget anyone's birthday! 


Monday, April 27, 2015

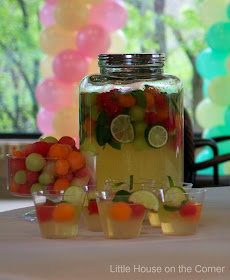
Melon Ball Punch

In my last post I shared the coffee filter bow I made for a co-worker's baby shower gift. Another exciting thing that came from the baby shower was the discovery of this amazing Melon Ball Punch, which I was assigned to make.

I can't take any credit for the recipe because it came directly from Divas Can Cook. So you should just click on that link right there to check out the full recipe and a nice little how-to video. 

The purpose of my post is just to share the pretty pictures of my successful experience making this fabulous punch. Not only is it delicious, it's also beautiful. A total crowd-pleaser in looks and taste!


Thursday, April 23, 2015

DIY Coffee Filter Gift Bow

This week we had a baby shower for a co-worker, and I wanted to coordinate my gift packaging with the decor which was kind of pastel and vintage-y. I got some mint & white striped wrapping paper from Hobby Lobby (using a 40% off coupon of course). The paper doesn't have a message so it can also be used for birthdays, weddings, etc... I'm all about versatility!

To dress up the gift, I sought inspiration from my recent coffee filter floral wreath project. Now that I'd been enlightened to the crafty potential of coffee filters, I figured there had to be a way to make some sort of bow with them.  And as it turns out there was--except I don't have a step-by-step tutorial for it since I was experimenting on the fly. 

Basically I just folded several coffee filters into halves (twice), then bunched them together, and tied some jute around the bunched-up bottoms very tightly. (So technical, right?) Then I scrounged around my craft stash for some scraps of lace and wrapped this around to cover the jute. Add just a dab of hot glue to secure the lace.

To give the gift more of a rustic feel, I used jute instead of regular ribbon, and then tied the coffee filter bow into the middle. For as randomly as it was constructed, I was pretty happy with the final outcome. It's more like a flower/bow combo, really.


And bonus, the bow didn't fall apart when the guest-of-honor unwrapped the box, which I was a little afraid might happen. So I must have done something right.

This pretty packaging would also work great for a bridal shower or wedding gift. If you're the slightest bit crafty, you can easily make your own bow just like this (or probably better)!  And coffee filters are stupid cheap -- like 100 for $1 -- so it's a very cost-effective method too.

Have you ever created your own gift bows?


Thursday, April 16, 2015

DIY Coffee Filter Floral Wreath

You guys. I am so stoked about this project. (Does anyone used the word stoked anymore?) In fact, I’m just going to glaze over the fact that it’s been five months since my last blog post, and dive right into this masterpiece.

I’ve been wanting to make a fun, spring/summer indoor wreath and had seen several coffee filter wreaths on Pinterest. So this was the perfect excuse for a good ol’ DIY evening. It really is an easy project and doesn’t take a whole lot of skill – just a lot of coffee filters, time, and patience (and maybe a couple glasses of wine if you’re so inclined). But it’s worth the end result if you ask me.


Aside from the coffee filters (which only cost $1 for a package of 100), I got all my supplies at Hobby Lobby:
Coffee filters (2 packs)
12” wreath form
Sewing pins (box of 325)
Faux flowers (on clearance!)
Total cost: About $10